Tuesday, October 23, 2012

Delicate Greens

What is your favourite colour? Mine has and will always be green. I attended many schools as a child because my father's work kept us on the move. Uncannily, I was always assigned to green house colours in every school I attended from primary to secondary schools. For me, green is soothing, refreshing, peaceful, lush, vibrant, rich, moist, fragrance of pine and apples, freshly mowed lawn, refreshing, cooling, earthy - it makes me happy.

In card making, I always want to make green cards but with self restraint, manage to create cards/projects in other colours too. I always love the results of my green creations though. So, here's a delicate green version of my Delicate Doilies card in my previous post.

project recipe
stamps: Delicate Doilies  (W124960, C122592), Happiest Birthday Wishes (retired Hostess)
ink: Classic Stampin' Pad - Lucky Limeade (126984), Pool Party (126982), Gumball Green (126861)
card stock: Lucky Limeade (124388), Gumball Green (127543), Whisper White (106549)
tools: Brayer (102395), 1-3/4" Scallop Circle Punch (119854), 1-3/8" & 1" Circle Punches (119860, 119868) 
added pizzazz: Rhinestone Basic Jewels (119246), Stampin' Dimensionals (104430)

have a great day

Friday, October 19, 2012

Brayer Misadventure & Delicate Doilies


Not long after I became a Stampin' Up! demonstrator, I was introduced to the brayer by my upline's upline when we had an afternoon of card making. It didn't seem too difficult but I felt that I could achieve the same results with other techniques. Before long, I realised that pastel blending, ink sponging or water colouring with inks, pencils and crayons could not give me a smooth and/or solid colour transfer on to card stock - it was time to buy a brayer. Armed with my new brayer, I could not achieve the spectacular results I had always seen on the internet. I concluded that I was hopeless at brayering and gave up.


However, at my group Catalogue Party, I was asked to show people how to use a brayer. Why? Because I had sought out Kerry Bunting (whom I call the the Brayer Guru) at the 2012 Melbourne Heartfelt Event and had made sure that I didn't miss her demonstration. I watched it, recorded it and when I tried it at home, again my efforts were a flop. I didn't want to be a bad carpenter blaming her tools but I finally asked Kerry about her opinion on brayers.


Duh! Why did I even ask? I should have known that the answer would be the SU brayer. I have professed in my profile that I am an SU snob yet all this time, I had bought and persisted with a non SU brayer which equals brayering FAIL. So, when I was asked to showcase brayering at the catalogue party, I panicked!

I still had this brayer,

failure with non SU brayer
the real deal - SU brayer
not this one

and was totally unsure if I could produce the goods!


I had to go borrow my upline's SU brayer and ahhhhhhhhhh......, a big sigh of relief. I could actually brayer quite nicely. Indeed, all brayers are not made equal and this misadventure with a "happily ever after" ending reinforces my belief that Stampin' Up! produces and/or provides us with high quality products although I temporarily forgot this fact!

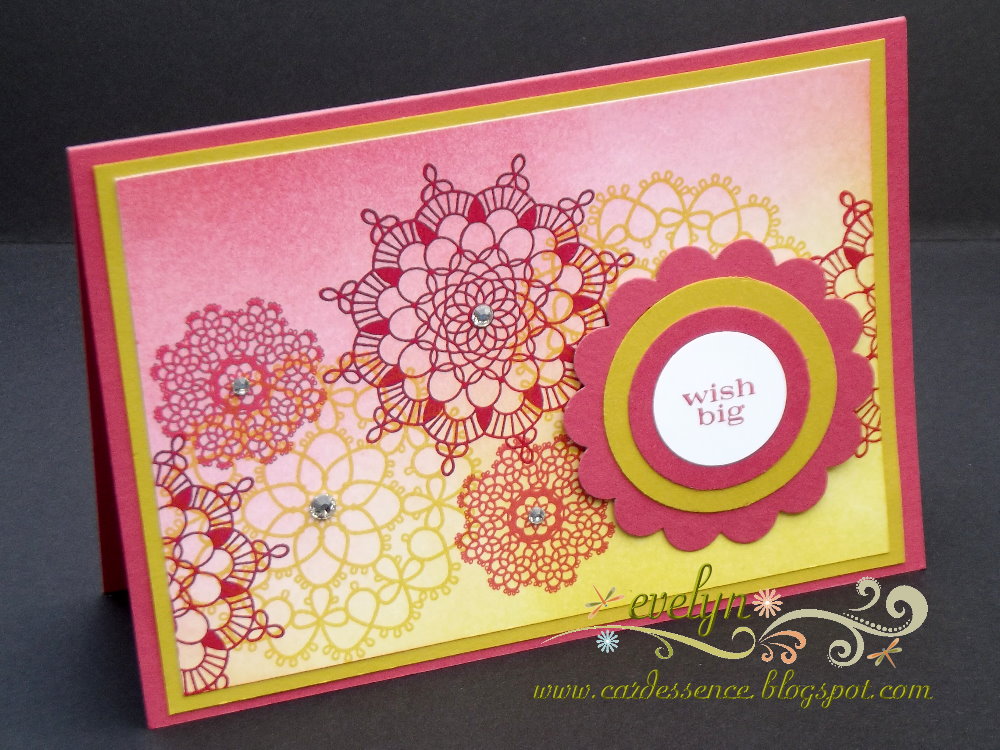
Thus, I was able to show everyone how to brayer 2 colours together. Everyone got to make a card topper like my sample below. Do you like it? The colours reminded me of Indian Sarees, don't you think?

project recipe
stamps: Delicate Doilies  (W124960, C122592), Pennant Parade (W125012, C122742
ink: Classic Stampin' Pad - Primrose Petal (126858), Summer Starfruit (126991), Raspberry Ripple (126859)
card stock: Primrose Petals (127544), Summer Starfruit (127542), Whisper White (106549)
tools: Brayer (102395), 2-3/8" Scallop Circle Punch (118874), 1-3/4", 1-3/8" & 1" Circle Punches ( 119850, 119860, 119868) 
added pizzazz: Rhinestone Basic Jewels (119246), Stampin' Dimensionals (104430)


cardessence tips
  • roll only in one direction when you are loading ink onto your brayer as rolling it back and forth will leave "ink lines" on your roller which will transfer to your cardstock and thus will spoil the blend;
  • you can start with either Primrose Petal or Summer Starfruit in opposite corners but do not start brayering right onto the card stock ie. work from outside your card stock into the middle;
  • there are 2 ways you can work your brayer (assuming that you are right handed)
  1. Brayering with a cardboard underlay: With the brayer in your right hand, roll it back and forth from outside your card stock (right to left) into the middle - the colour lightens as you move into the middle. This method works best because the brayer being rolled back and forth and right to left will then not cause the cardboard to crinkle and scrunch up underneath your brayered card stock which will cause uneven ink distribution.
  2. Brayering with paper underlay: The above method will cause the paper to scrunch up underneath the card stock so the best way is to roll your brayer back and forth without moving from right to left. You will have to coordinate this with feeding your cardstock into the brayering ie. move your card stock from left to right. Heh, heh, heh, it's a bit like rubbing your tummy whilst patting your head and vice-versa.
  • I don't think that you can truly understand the difference and why it works without trying it out so, give the 2 different ways a go if you are new to brayering - hope it all makes sense.
Well, I hope that you enjoyed reading about my misadventure and had a good laugh about it. By the way, I have just received my very own SU brayer (a month after the catalogue party). Look for more of my brayered samples that I displayed at the catalogue party in my next posts.

TTFN

Wednesday, October 17, 2012

Firm Foam Ink Pads

Aren't I just way, way behind everyone in getting new information to you? There's already heaps of information and reviews regarding the new firm foam ink pads that you can "google" or "bing" for, but I will tell you anyway.

With the introduction of the 2012-2013 annual catalogue, SU made a very big change to their Classic Stampin' Pads.  To improve your stamping experience, SU has introduced firm foam pads.

In a Nutshell:
I love the new firm foam ink pads primarily because I'm loving the crisper stamped images I am achieving plus I am able to heat emboss my images without using VersaMark when I quickly sprinkle embossing powders before the ink dries on the images. The reason for the crisper images and ability to heat emboss is because more ink is transferred from ink pad to rubber stamp and to card stock. Hence, this leads to a small downside - you will need to re-ink your firm foam pad sooner than you did with the old felt pads especially with your frequent use colours, eg. Christmas colours in the next couple of months so it's best that you refills handy when you are on a stamping spree :-)


Below is the official information provided, but please feel free to contact me if you have any questions.

"...We know you're going to love these new Stampin' Pads - just look at all the exciting benefits listed below:
  • Provide better ink coverage for your stamps!
  • Light-tap stamping produces flawless images!
In addition, our new Stampin' Pads
  • Create wonderfully solid images. The Firm Foam releases more ink onto your rubber stamp than the felt pads. When using the Firm Foam pad, your stamp will get an even, solid covering of ink that you may not have been able to achieve with the felt pads. Please note: if you are using the ink pad frequently you may need to re-ink your Firm Foam pad more often. We recommend that you purchase a refill at the time of your ink pad purchase.
  • Have a crisply printed, glossy label on the top of the pad that is easier to read and that will not fade or chip off!
  • Come with colour name labels in all four languages (English, Spanish, French and German)--just choose your language, peel it off the back and add it to the side of the pad for easy identification!
  • Use the same patented flip-top case design that stores the inking surface upside down, so the pad surface stays moist!
  • Are available in all colours, including our exclusive In Colors!
Please note: Five ink colours have undergone formula changes to improve functionality and colour stability with the new firm foam pads. These colours are
  • Basic Black
  • Basic Gray
  • Marina Mist
  • Perfect Plum
  • Tempting Turquoise
All five colours of the reformulated inks have been fully tested and approved. While using the new ink formula in the old Stampin' Pads is fine, we do not recommend using the old ink formula in the new firm foam pads in the five colours listed above.

We do not recommend using the Basic Black Classic Stampin' Pad on Whisper White or Very Vanilla Card Stock. Instead, we recommend you use the StazOn Ink Pad
."


Additional features:
  • The firm foam is nice and flat and will not become wavy - no more dip in the middle of the pad;
  • The firm foam material does not imprint on the stamp images like the felt pad sometimes did. However, because the firm foam material is a foam base material, the stamp image can momentarily leave an imprint on the pad, which can transfer to a second stamped image. By inking your stamp on different areas of the pad or waiting momentarily for the ink to rise back to the top, you can easily avoid this situation.
  • The firm foam material is soft and has a nice bounce to it. It's not hard like the felt is - light-tap stamping produces crisp, complete coverage on both line and solid stamps - a huge difference is noticeable with solid stamps
  • The ink lay-down (how the ink is absorbed into the card stock) is even, not blotchy, and dries quickly. It has an increased opacity and stamps solid images beautifully.
  • The pads are juicier and are designed to stay that way longer. 
  • They come with colour name labels in all four languages (English, Spanish, French and German) - just choose your language, peel it off the back and add it to the side of the pad for easy identification!
The new pads are available in all SU colours including this year's new In Colours: Gumball Green, Midnight Muse, Summer Starfruit. Primrose Petals and Raspberry Ripple.